Sunday, November 22, 2015

Cutlers Peanut Butter Cookies

This recipe came along in such a funny coincidental way!  I went on a fun girls trip to St. George for Time Out For Women, and my cute friend kept saying how Cutlers Peanut Butter cookies are to die for!  And if you know me, I'm a peanut butter fan! I knew I had to try them!  So we never came across a Cutlers Cookies, but the craziest thing happened!  The next day I woke up to an email from one of my favorite food blogs I follow: Jaime Cooks It Up, and loan behold, it was Cutlers Peanut Butter Cookies!  I about died!  And apparently this recipe comes straight from the source, right off of Cutler Cookies blog!


The great part about these cookies are, that they are not frosted sugar cookies.  It's like a chocolate chip cookie recipe, but using peanut butter chips instead.  And then you first frost with a fabulous peanut butter frosting, and to be honest with you, I could stop right there. Yum.

But alas, the recipe calls for chocolate frosting to top off the peanut butter frosting, and oh boy!  Talk about sweet!  Like, so fulfilling that you really don't even want to go for a 2nd cookie, but not in a bad way, in a very satisfied way!  Yum!

And this sweet princess can vouch to how easy, fun, and yummy these cookies can be!!

Ingredients
COOKIE DOUGH:
1 C butter, softened
1 C brown sugar
1 C white sugar
2 eggs
1 tsp vanilla
3 C flour
1 tsp salt
1/2 tsp baking powder
1/2 tsp baking soda
1 (10 ounce) package Reese's Peanut Butter Chips

PEANUT BUTTER FROSTING:
1/2 C butter, softened
1/2 C creamy peanut butter
3 C powdered sugar
1 Tb milk

CHOCOLATE FROSTING:
1/2 C butter, softened
2.5 C powdered sugar
3 Tb unsweetened cocoa powder
1/2 Tb vanilla
1/8 c milk
Instructions
1. Preheat your oven to 350 degrees.
2. Into your stand mixer or large mixing bowl place 1 C softened butter, 1 C brown sugar and 1 C white sugar. Cream the mixture on medium speed for 2 minutes, scraping the bottom of the bowl to be sure the ingredients are well blended.
3. Add 2 eggs and beat for an additional minute. Add 1 tsp vanilla and mix until combined.
4. In a separate bowl place 3 C flour, 1 tsp salt, 1/2 tsp baking powder and 1/2 tsp baking soda. Toss the ingredients together with a fork and then add to the creamed mixture.
5. Toss in one package of Reese's Peanut Butter Chips and mix until combined. The original recipe suggests using the name brand only. :)
6. Spray a large cookie sheet and scoop the dough (I used a 1 1/2 inch scoop) onto the sheet.
7. Bake for 7-8 minutes, or until the top of the cookies crack. Remove the pan from the heat and allow the cookies to continue to cook on the pan for 2 minutes. Remove them to a wire rack to cool completely. Be sure not to over bake, gang. You want the cookies to be nice and soft.
8. To make the Peanut Butter Frosting place 1/2 C softened butter and 1/2 C creamy peanut butter into a medium-sized mixing bowl. Mix until smooth and glossy. Add 3 C powdered sugar, 1 Tb milk and a dash of salt. Mix until smooth and creamy. Add more milk if the frosting is too thick.
9. To make the chocolate frosting mix 1/2 C softened butter and 2.5 C powdered sugar together. Add 3 Tb unsweetened cocoa powder, 1/2 Tb vanilla and 1/8 C milk. Mix until smooth. Add more milk if it's too thick, or more powdered sugar if it's too thin.
10. When the cookies have cooled, frost each one with peanut butter frosting.
Spread some chocolate frosting over the peanut butter frosting. Be sure not to cover the peanut butter frosting completely. It's pretty to be able to see the double layer effect.

Friday, November 20, 2015

Apple Butter - Crockpot recipe

Fall is almost over and winter is sneaking upon us fast!  I made this yummy Apple Butter last year and accidentally used double the cinnamon amount and choked my way though it telling myself it was good!  This year I found a great over-nighter recipe, watched my cinnamon measuring like a hawk, and ended up with yummy Apple Butter!  A success!  It's super easy to do as well, which makes it a double bonus!!


All you have to do is skin those apples (optional but I like it that way), put them in the crockpot, add in a few yummy ingredients, turn on the crockpot, go to bed, and WHAM!  You wake up with your house smelling like apple cinnamon heaven!  It's amazing!


Ingredients:

1 dozen apples
2 teaspoons lemon juice
1/8 teaspoon nutmeg
3/4 teaspoon cinnamon
1/4 cup brown sugar
1/4 cup water
1/4 cup apple cider (just double your water if you don't have apple cider and add a tad more sweetener like more brown sugar, or a natural sweetener like Stevia)


Peel and slice up your apples, set them in the crockpot.  In a seperate bowl combine the remaining ingredients, pour over apples and rub until evenly coated.  Put the lid on, set on low, and leave over night up to 8-10 hours.  When you wake up to your heavenly smelling house, turn off crockpot and let it cool down slightly.  Then add to your blender and get it nice and smooth.  I put a few jars in my refrigerator and few in my freezer to keep nice and fresh!
Enjoy!

Friday, April 24, 2015

Popeye Muffins

So I've literally had this recipe hanging around since St. Patricks Day, and just stumbled across the picture I took on my camera!  So I figured, it's better late than never, because it's not like you can only make these bad boys for St. Patricks Day, you can have them anytime of the year!  Those green muffins are dyed purely by Spinach.  No artificial dyes or food colorings.  My Kids Loved them.  Heck, I loved them.  A little too much!  And the next best thing is they are sweetened with Pure Maple Syrup, not sugar.  They literally melt in your mouth!


makes 12

2 cups flour, I used 1 cup whole wheat, 1 cup white
2 teaspoons aluminum-free baking powder
½ teaspoon baking soda
½ teaspoon fine ground sea salt
1 large egg
¾ cup pure maple syrup (Grade A or Grade B)
¾ cup unsweetened almond milk)
¼ cup unrefined coconut oil, melted
2 teaspoons pure vanilla extract
1 5- or 6-ounce bag of fresh baby spinach leaves
2 medium ripe bananas, mashed
1/2 Cup Chocolate Chips

  1. Preheat oven to 350 degrees and line a standard 12-cup muffin tin with unbleached parchment liners.
  2. In a large bowl, whisk together the flour, baking powder, baking soda and salt.
  3. In a blender add egg, maple syrup, milk, oil, vanilla and spinach.  Process until pureed.
  4. Add spinach mixture to the flour mixture and stir until just combined.  Fold in the mashed banana and Chocolate Chips.
  5. Scoop batter into prepared muffin tin, filling cups about ¾ full.    Bake about 25 minutes, or until toothpick inserted into the center comes out clean.
  6. Store at room temperature up to 3 days.  These freeze nicely!

Tuesday, March 24, 2015

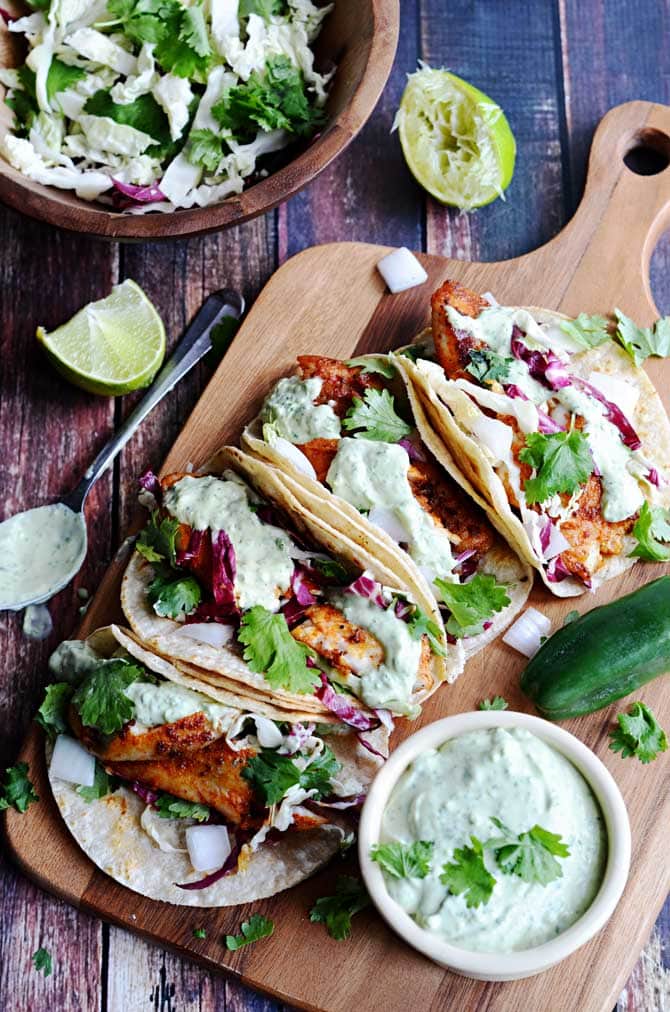
Spicy Blackened Tilapia Tacos with Avocado-Cilantro Cream Sauce

If you know anything about me, or have looked through my blogs, I HATE, (yes that's a strong word) Hate, seafood!  I mean, I can't even to tuna fish.  No shrimp, no California roll, Nothing!  So don't ask me why I've been on a quest to get a good tilapia recipe.  I guess you can say it's the one fish, I could almost, kinda, sorta tolerate if I was forced to take a bite!  But I just know how healthy fish can be, so when I saw this recipe, I decided to give it a whirl, and seriously ate it 3 times in 1 week because I LOVED it that much!  So give it try!


 BLACKENED FISH TACOS WITH AVOCADO-CILANTRO SAUCE
 
hOST THE tOAST
COOK TIME
TOTAL TIME
 

Serves: 6
INGREDIENTS
For the Blackened Fish:
  • 1.5 lbs tilapia fillets
  • 1 ½ teaspoons smoked paprika
  • 1 teaspoon garlic powder
  • 1 teaspoon dried oregano
  • 1 teaspoon onion powder
  • ½ teaspoon cumin
  • ½ teaspoon salt
  • ½ teaspoon brown sugar / I used organic coconut sugar
  • ¼ teaspoon cayenne pepper
  • 2 tablespoons olive oil or coconut oil
  • 6 corn tortillas
For the Slaw:
  • ½ red cabbage, sliced thin
  • ¼ green cabbage, sliced thin
  • ½ medium-sized onion, diced
  • ½ cup cilantro - chopped
  • Juice of 1 lime
For the Avocado-Cilantro Sauce:
  • ½ cup sour cream or plain greek yogurt
  • 1 ripe avocado, pitted and skinned
  • ¼ cup cilantro, chopped
  • Juice of 1 lime
  • 1 jalapeno, chopped and seeded
  • Salt, to taste
DIRECTIONS
  1. In a small bowl, combine the smoked paprika, garlic powder, dried oregano, onion powder, cumin, salt, brown sugar, and cayenne pepper. Sprinkle the mixture over both sides of your tilapia fillets, and then rub the seasonings in.
  2. Combine all of the Avocado-Cilantro Sauce ingredients in a food processor or blender. Pulse until well-combined.
  3. Combine all of the Slaw ingredients in a large bowl and mix well.
  4. Heat the oil in a heavy-bottomed pan over medium-high heat. Once heated, add in the tilapia (a few at a time if you can't fit them all at once). Cook for 4-5 minutes on each side, or until the outside is blackened and the fish flakes apart easily.
  5. Remove the fish from the heat, and warm the corn tortillas on a skillet over medium heat, cooking for about 30 seconds on each side.
  6. Break up the tilapia into 2-3" pieces.  Distribute the fish evenly between the 6 tortillas, and top with Slaw and Avocado-Cilantro Sauce. Serve.


Recipe adapted from: Host the Toast Food Blog

Monday, March 2, 2015

Cauliflower Crust Pizza

 Ok, so I've been really wanting to try this whole cauliflower crust thing for a LONG time, and just haven't gotten around to it.  I've done the Zucchini crust thing and it was good.  Soft, but good.  So It was make your own pizza night with the kiddos, so I decided, I get to make my own pizza too!  Guiltless, and no grains in my crust!  I could call this Paleo'sh, if I wanted too.  It all depends on if you allow dairy into your paleo lifestyle, which I do.  I try to go light on dairy, so it has to be for a special dish.  And I think Pizza is a special dish that REQUIRES, cheese!  Am I right???
Even after getting the "weirdo" look from my Husband, after it was all said and done, cooked and cut, I got the approval from him saying it was good, and really not that different from a regular crust.  A tad softer, but the taste is not compromised at all!  It tastes awesome!  And I actually had it for lunch the next day with a cut up chicken breast for a tad more protein and it was fulfilling and yummy!
The biggest tip I can give you to get your crust to turn out firm and crusty, is after you "rice" your cauliflower, cook it in the microwave for 4 minutes, dump it onto a Tea Towel, wait for it to cool so you can handle it, then wring the heck out of it until you can't get anymore liquid out of it, and it looks like a ball of dough, like this!


 Grain-Free Cauliflower Crust Pizza
makes one approx. 10-12 inch pizza

1 small to medium sized head of cauliflower - should yield  3 cups once processed
1/4 teaspoon kosher salt
1/2 teaspoon dried basil (crush it even more between your fingers)
1/2 teaspoon dried oregano (crush it even more between you fingers)
1/2 teaspoon garlic powder
optional a few shakes of crushed red pepper
1/4 cup shredded parmesan cheese
1/4 cup mozzarella cheese
1 egg

Then use your preference on pizza sauce and toppings!  You all know how you like to dress your pizza up!

Place a pizza stone in the oven, or baking sheet if you don't have a pizza stone. Preheat oven to 450 degrees. On a cutting board, place a large piece of parchment paper and spray it with nonstick cooking oil. 

Wash and thoroughly dry a small head of cauliflower.  Cut off the florets. Pulse in your food processor for about 30 seconds, until you get powdery snow like cauliflower. You should end up with  3 cups cauliflower "snow". Place the cauliflower in a microwave safe bowl and cover. Microwave for 4 minutes. Dump cooked cauliflower onto a clean tea towel and allow to cool for a bit before attempting the next step.

Once cauliflower is cool enough to handle, wrap it up in the dish towel and wring the heck out of it. You want to squeeze out as much water as possible. This will ensure you get a chewy pizza like crust instead of a crumbly mess. 

Dump cauliflower into a bowl. Now add 1/4 cup parmesan cheese, 1/4 cup mozzarella cheese, 1/4 teaspoon kosher salt, 1/2 teaspoon dried basil (crush up the leaves even more between your fingers before adding), 1/2 teaspoon dried oregano (crush up the leaves even more between your fingers before adding), 1/2 teaspoon garlic powder (not garlic salt), and a dash of red pepper if you want.  Now add your egg and mix away. Hands  or a a fork tend to work best. 

Once mixed together, use your hands to form the dough into a crust on your oiled parchment paper. Pat it down thoroughly, you want it nice and tightly formed together. Don't make it too thick or thin either.

Using a cutting board slide the parchment paper onto your hot pizza stone or baking sheet in the oven. Bake for 10-14 minutes, until it starts to turn golden brown. Remove from oven.

Add however much sauce, cheese, and toppings you want.  Slide parchment with topped pizza back in the hot oven and cook for another 5 to 7 minutes until the cheese is melted, bubbly, and slightly golden.

Test your patience and allow it to cool for a minute or two. Probably closer to two. Then using a pizza cutter and a spatula serve up your delicious grain-free cauliflower crust pizza!

*** Oven time may very!  Just make sure you cook the crust long enough that its not a crumbly soft mess.  Also make sure if you don't have a silicone pat, use parchment paper, not wax paper or tin foil!  
*** If you are  don't get enough "cauliflower snow out of your head of cauliflower, you can always add in a tablespoon or 2 of Almond meal to get the thickness you need.  


I got this recipe off of Pinterest from a wonderful blog called THE LUCKY PENNY BLOG

Sunday, February 22, 2015

Slow Cooker Asian Chicken Lettuce Wraps

So I know that I've mentioned this before, but the way I create my recipes, is by looking at at LEAST 3 recipes of the meal I want to prepare, and basically take what I want from each recipes, and make my own hand crafted version of the ingredients I love!  That's the way I work!  And it works good for me!  I actually have a recipe of lettuce wraps on my blog HERE, but this version hit the spot for me.  Much more flavorable, and much easier!  Can I get a woot woot for crockpot meals?!?!?!?


I made these for dinner earlier in the week and my husband loved them!  So when I informed him I was in charge of the Appetizer for a progressive dinner this past Friday, I asked him what appetizer I should make, and he said "Is that even a question?!"  Ha Ha!  So of course Lettuce wraps is what I made!  And they were a hit!  The first time I made these, I used Romaine Lettuce.  And the second time I used these live Butter Leaves.  They both have their Pros and Cons.  I actually liked eating these with the Romaine Leaves because it gives a better crunch and holds the juices in better.  But they aren't soo pretty and sometimes they crack.  The Butter Leaves are just pretty, now aren't they?  They take good pictures and they are presentable.  But they are soft, no crunch and juice gets everywhere.  So you get to pick and choose for yourself.


Slow Cooker Asian Chicken Lettuce Wraps
Prep Time: 15 minutes
Cook Time: 3 hours
Yield: About 12 wraps, about 6 servings
Ingredients
  • 1 tblsp olive oil
  • 2 lbs ground chicken 
  • 3 cloves garlic, minced
  • 1  Zucchini, chopped small
  • 1 red bell pepper, cored and finely chopped
  • 1/2 cup finely chopped yellow onion
  • 1/2 cup hoisin sauce
  • 3 Tbsp soy sauce
  • Salt and freshly ground black pepper
  • 3 green onions, sliced
  • 1 Tbsp rice vinegar
  • 1 1/2 tsp sesame oil 
  • Romaine Lettuce or Live Butter Leaves
  • 1/4 chopped peanuts or Cashews
Directions
  • Place oil and ground chicken in a large skillet and cook until browned.  Drain the fat and pour into a 5 - 7 quart slow cooker. Add zucchini, bell pepper, onion, and garlic back to the skillet and saute until softened, about 3-5 minutes.  Add to your crock pot and add in your hoisin sauce, soy sauce, rice vinegar, sesame oil, 1/2 tsp salt and 1/2 tsp pepper and toss mixture. Cover and cook on low heat about  3 hours until chicken is tender.
  • Stir in your green onions and cook until heated through 3 - 5 minutes.  Separate lettuce leaves and serve with chicken filling and add your peanuts.

Wednesday, January 14, 2015

Pico De Gallo

 I Love a good Pico De Gallo, Sometimes more than Salsa.  The texture and taste of a good Pico is soo much more.......  MORE!!!!  Super easy to make, and goes with soo many dishes!  This is the Pico I added to my Chicken Tortilla Soup I previously posted!  Enjoy!!!

Pico de Gallo
Print
Ingredients
  • 4-5 vine-ripened tomatoes, finely diced
  • ½ to 1 tsp. Sea salt (or to taste)
  • 1/2 medium onion, finely diced
  • 3 cloves garlic, minced
  • 1/2 bunch cilantro, finely chopped 
  • 2 Tbsp. chopped jalapeno 
  • juice of ½ lime
Instructions
  1. In a medium-sized bowl, toss diced tomatoes with Kosher salt until salt is evenly distributed. Add remaining ingredients and stir together well. If you decide to refrigerate the salsa to allow flavors to combine, be sure to let it get to room temperature before serving (trust me-- it is better at room temp)!

Friday, January 9, 2015

Chicken Tortilla Soup

This soup is fantastic!  Who doesn't love a good healthy filling soup?  I've been meaning to post this all season, and I'm just not soo good at getting my recipes up anymore!  This soup is super easy, with easy ingredients as well!  Go ahead and give it a try!  It's super good for the new waistline we are all looking for right now!!


If your looking to go Paleo, all you have to do is leave out the sour cream and tortilla chips if your super strict!  Oh and the Pico on top of this is amazing!  I will be posting that next!!


Serves 4-5

 Ingredients
  • 1/2 onion, diced
  • 1 Tbsp. olive oil
  • 1 tsp cumin
  • a dash (or two) cayenne
  • 1 tsp. chili powder
  • 5 c. chicken broth
  • 3 Tbsp. fresh cilantro, finely chopped
  • juice of ½ lime
  • pepper, to taste
  • 1 tsp salt
  • 1 can pinto beans, drained and rinsed
  • 2-3 boneless, skinless chicken breasts
  • 2 Tbsp. taco seasoning
  • 1 Tbsp. paprika
  • olive oil (to taste)
  • pico de gallo - Recipe HERE
  • 2-3 avocados, diced
  • cheese (optional)
  • tortilla strips (optional)
  • cilantro (for garnish)
  • lime wedges (for garnish)
Instructions
  1. In a small skillet, saute onion in 1 Tbsp. oil until onions become slightly soft. Stir in cumin, cayenne, and chili powder and saute an additional minute or two.
  2. Transfer seasoned onions to a small crock pot (or medium-sized saucepan). Add chicken broth, cliantro, lime juice, pepper and pinto beans to onions and simmer on low-heat for at least 2-3 hours.
  3. In the meantime (when you are close to serving), combine taco seasoning and paprika. Brush chicken with oil and rub with taco seasoning/paprika mixture. Grill chicken over medium-heat until cooked through (try to turn only once during the grilling process). Remove from grill and shred.
  4. In individual bowls layer chicken, about ⅓ c. pico de gallo, ⅓ c. diced avocado, and ⅓ c. pepper jack cheese. Ladle about 1 cup of chicken broth directly over the layers. Top with tortilla strips and garnish with cilantro and lime wedges.  
**  If you are in a hurry, you can use already cooked chicken and throw it in the crockpot, or heat it up right before serving.